How I built a website from scratch using GatsbyJS and AWS
Architecture
Static File Hosting with AWS
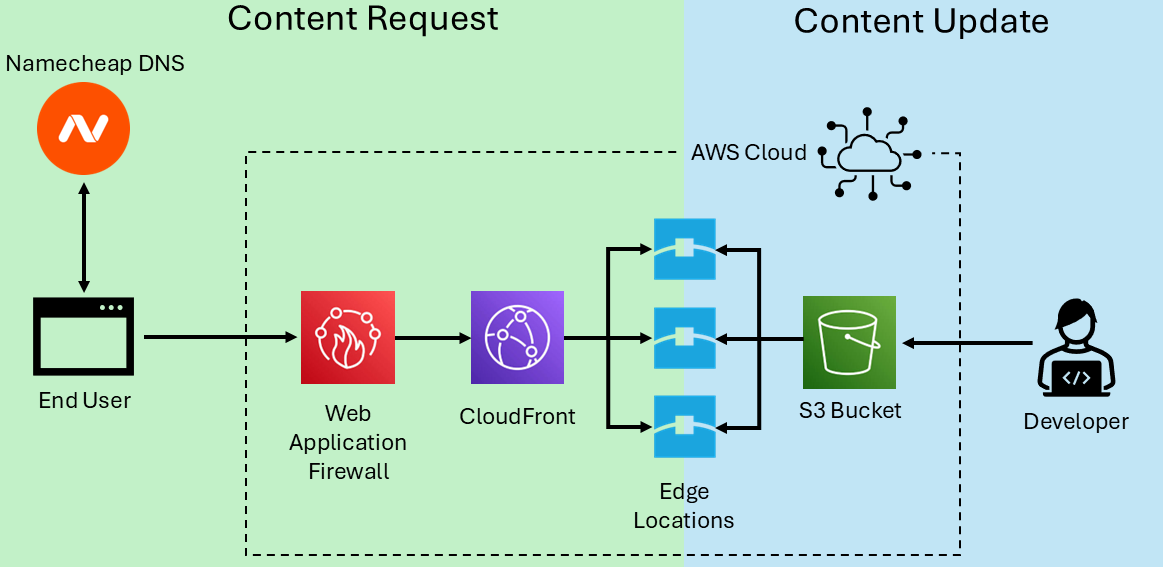
Before I discuss my approach for coding the website, I am going to explain my cloud hosting setup. Regardless of the framework you use to build your static site, you can host it on AWS using a combination of:
- S3 Buckets for object storage. This is where I upload the static files that comprise my website. The S3 bucket will need to be configured for public read access, meaning that anyone can see everything stored on the bucket. Consequently, I have a dedicated bucket not shared with any other projects
- Cloud Front CDN. A content delivery network caches a copy of your website at edge locations around the globe. When a Cloud Front receives an HTTP request, it routes it to the location that is physically closest to the user. The edge locations are updated whenever you make a change to your master copy, which lives on S3.
- Web Application Firewall. AWS WAF is an easy way to filter web traffic, reducing the risk of overwhelming traffic from bots, which could be web scraping or a DDOS attack. It comes with built-in rules, and can be further configured to fit your needs.
When a user requests content from the website, the name "www.neuralnova.net" redirects to the url provided by my CloudFront distribution. This is configured using DNS records. Requests to the CloudFront URL are handled by AWS, which feeds traffic into the WAF. Any traffic not blocked by WAF is directed to the nearest CloudFront edge location. Edge locations contain cached versions of my website, and are updated whenever I make changes to the S3 bucket that contains the master-copy.
Building the Website
We have a broad understanding of how the user requests a webpage and where the underlying data is stored on AWS. Now the question is, how do we create the static files that comprise the website? I chose to use Gatsby, a framework for creating websites. Gatsby is built around React, one of the main libraries for creating web interfaces using Javascript.
React allows you to easily create complex web UIs via reusable components that compartmentalize application logic. Gatsby helps turn your React project into a website, providing the connection between your data sources and your application code. You provide data sources to Gatsby, which can later be fetched inside your React components using GraphQL.
The documentation pages for these projects provide a much more thorough explanation, and I encourage you to read them. If you are in a rush, this diagram gives a quick-and-dirty overview of the process:
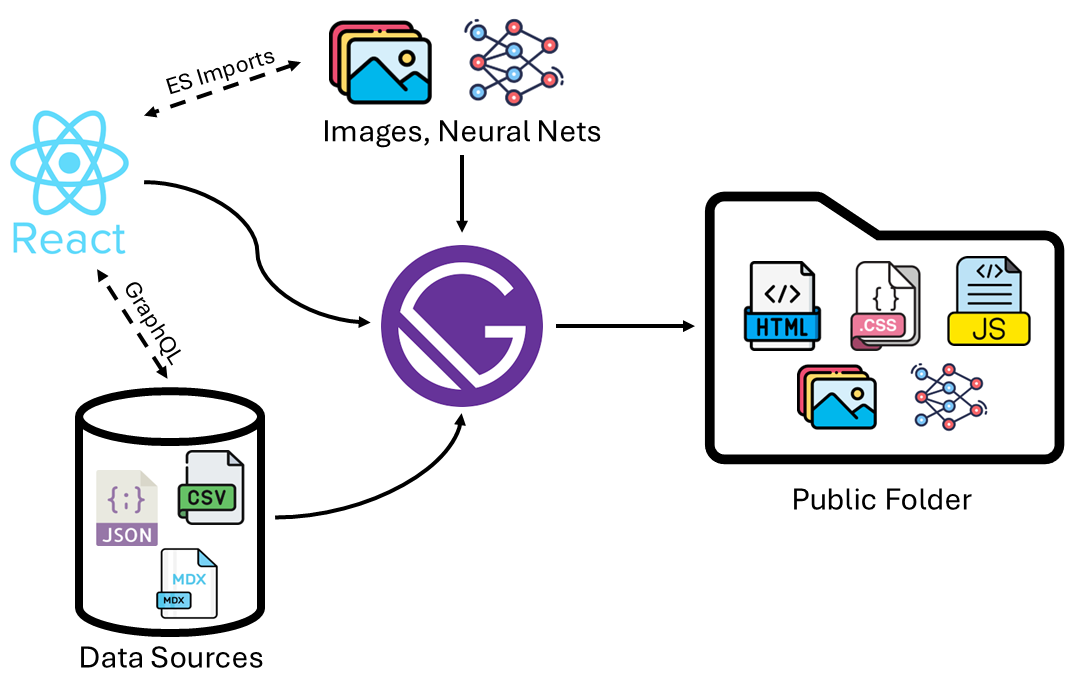
Application code is written in React and lives under the src/ directory of my project.
React components act as reusable templates that can be populated with data from various
directories outside src/.
Gatsby brings these sources together and exposes them to your React code using GraphQL.
The layout of every blog page on Neural Nova is defined by one TypeScript file, while
the content of the posts are stored in MDX files.
When Gatsby builds the website, it:
- Looks for MDX files that match the criteria
- Populates the template with the data from each MDX file
- Creates a unique URL for each page
- Compiles resources into minified asset bundles optimized for web browsers
The final result is the public/ folder, which I upload to the AWS S3 bucket connected
to my CloudFront distribution. This folder contains the HTML, JS, and CS files that the
web browser uses to render the page. It also contains the static assets such as images, PDFs,
and neural network weights.
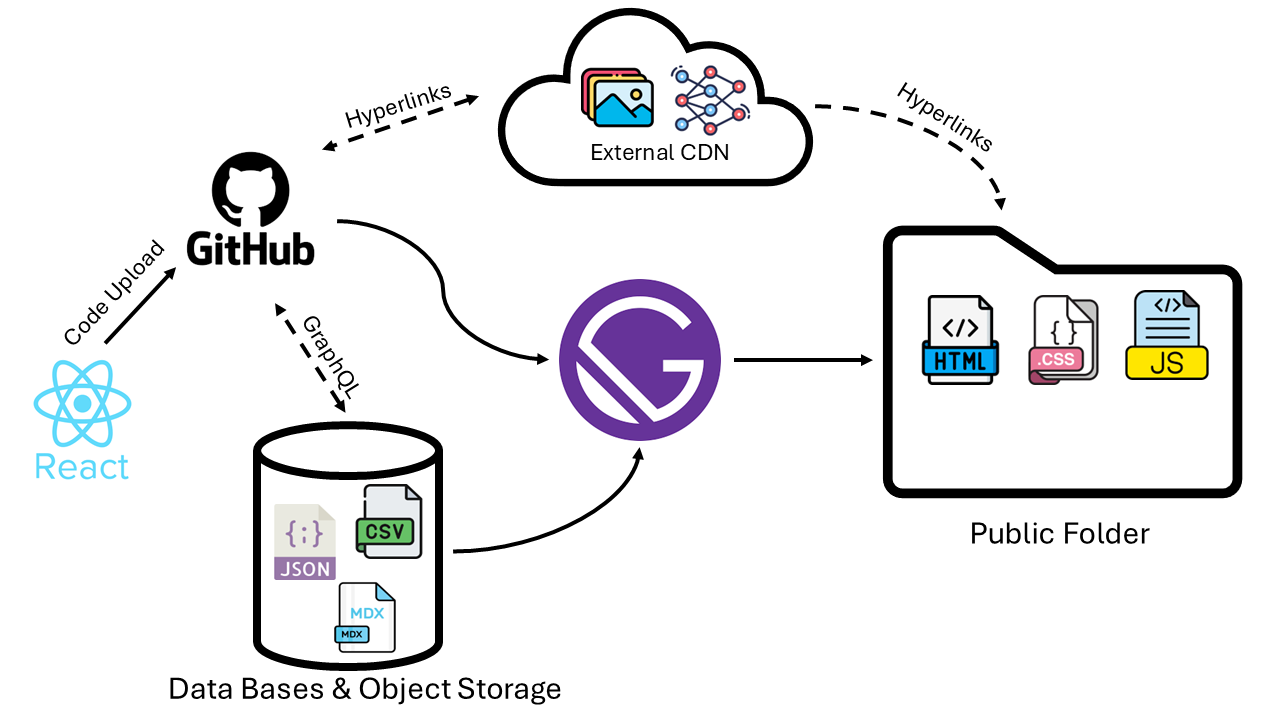
Alternative Strategy - Cloud CI/CD
All of this happens on my local computer — my data sources are files on disk and Gatsby runs using my NodeJs environment. This is fine and dandy for a small project managed by one developer, as it keeps things simple and reduces cloud hosting fees. However, if the website grows to have thousands of pages written by many authors and maintained by multiple developers, things can get messy.
In this case, we can move each component in the previous diagram to the cloud. A version control repository (GitHub) allows developers to sync their changes and work on features simultaneously via branches. When the master branch is updated, GitHub sends a signal to our build server. The build server runs Gatsby, pulling our source code from GitHub and data from other sources such as a data lake. It creates the public folder, which is then deployed to our hosting provider (AWS).
Additionally, our static assets such as images don't need to be included in the final public folder. They can live on their own content delivery network (CDN) similar to the CloudFront system we use to deploy the website itself. When our website wants to use one of these images, it simply includes the appropriate link to the external CDN where our static files are hosted.
Templates and MDX Files
I briefly described how Gatsby constructs each blog post from a React template and MDX data files. To better understand how this works, lets look at a snippet of my code:
1 function BlogPage({data, children}: PageProps<Queries.TypegenBlogPageQuery>): React.JSX.Element {2 return (3 <Layout>4 <ArticleSidebar pageDataMdx={data.pageDataMdx}/>5 <div className="content-wrapper">6 <h1 className='article-title'>{data.pageDataMdx?.article?.longTitle}</h1>7 <p className='page-title'>{data.pageDataMdx?.frontmatter?.pageTitle}</p>8 {children}9 <BottomButtons pageDataMdx={data.pageDataMdx}/>10 </div>11 </Layout>12 )13 }1415 export const query = graphql`16 query TypegenBlogPage($id: String){17 pageDataMdx(id: {eq: $id}) {18 article {19 datePublished20 title21 longTitle22 author {23 displayName24 }25 pages {26 frontmatter {27 page28 pageTitle29 }30 h231 slug32 }33 resources {34 displayName35 download36 link37 local38 localFile {39 publicURL40 }41 }42 }43 frontmatter {44 pageTitle45 page46 }47 }48 }49 `
At the top of the snippet, a function defines our BlogPage template as a React Component.
In the signature, we accept the data and children attributes of the PageProps element.
This information is passed into our template by Gatsby when the site is built.
The data attribute contains metadata about the blog post, which is requested via the query
defined below the function. We export a graphql query string, which Gatsby automatically detects when parsing the template.
The query requests data stitched together from a few different JSON files. These files contain information
on the articles and authors.
The children attribute contains the payload of the MDX file.
This is the main body of our article, and we inject it into the template using {children}.
Here is an extract from the MDX file used to build this page:
1 import Img1 from '../images/aws_hosting_diagram.png'2 import Img2 from '../images/gatsby_build_diagram.png'3 import Img3 from '../images/gatsby_build_diagram_cloud.png'4 import {CodeBlock} from "../../src/components/article/codeBlock";56 ## Static File Hosting with AWS7 Before I discuss my approach for coding the website, I am going to explain my8 cloud hosting setup.9 Regardless of the framework you use to build your static site, you can host it10 on AWS using a combination of:1112 * **S3 Buckets** for object storage. This is where I upload the static files that13 comprise my website. The S3 bucket will need to be configured for public read access,14 meaning that anyone can see everything stored on the bucket. Consequently, I have a dedicated15 bucket not shared with any other projects16 * **Cloud Front CDN.** A content delivery network caches a copy of your website at *edge locations*17 around the globe. When a Cloud Front receives an HTTP request, it routes it to the location18 that is physically closest to the user. The edge locations are updated whenever you make a change19 to your master copy, which lives on S3.20 * **Web Application Firewall.** AWS WAF is an easy way to filter web traffic, reducing the risk21 of overwhelming traffic from bots, which could be web scraping or a DDOS attack.22 It comes with built-in rules, and can be further configured to fit your needs.
MDX is a type of Markdown language
used to assimilate long textual content with segments of code.
It is like the developer's word document, allowing you to inject arbitrary items
(pictures, tables, forums, etc.) into your main content.
At the top of the file, I import the CodeBlock component from elsewhere in the project.
This React component has its own state and logic for adding line numbers and syntax highlighting.
What makes this very powerful is that you can inject any React component into your articles. This allows you nearly unlimited freedom to create anything to fit your needs via Javascript. Such as this chart that displays the ethereum market price in real time thanks to the free CryptoCompare API:
Gatsby-Node.ts
There is one more step required for this strategy to work.
We need to tell Gatsby which files and data are used to build each
blog page by modifying the createPages function in the gatsby-node.ts file.
This file gives us the flexibility to control Gatsby's build process and fine-tune
its behavior as needed.
A list of the functions provided by the Gatsby Node API can be found
here.
In our createPages function, we will:
- Query GraphQL for every MDX page that belongs to an article
- Stop build process if data fetch failed
- Iterate through these nodes with
forEach:- Identify absolute path of MDX file
- Create the unique URL (slug) of the page
- Set the component for the page, providing the special
?___contentFilePathparameter to indicate that MDX data should be processed and passed to the{children}prop. - Provide the ID of the Gatsby Node to be used in the template query.
1 export const createPages: GatsbyNode["createPages"] = async (args) => {2 const result = await args.graphql(`3 query {4 allPageDataMdx {5 nodes {6 id7 parent {8 ... on File {9 absolutePath10 }11 }12 article {13 title14 }15 frontmatter {16 pageTitle17 }18 }19 }20 }21 `)2223 if (result.errors) {24 console.error('Error loading Blog Pages', result.errors)25 return;26 }2728 result.data.allPageDataMdx.nodes.forEach((value) => {29 const contentPath = value.parent.absolutePath;30 const templatePath = path.resolve(`./src/templates/blog_post_page.tsx`);31 args.actions.createPage({32 path: articlePageSlug(value.article, value),33 component: `${templatePath}?__contentFilePath=${contentPath}`,34 context: {35 id: value.id,36 }37 });38 })
When Gatsby builds the website, it calls this function to create any programmatic pages.
Pages manually created (not belonging to a template) are handled by Gatsby's file-system API
and assigned their URL based on their location within the src/pages folder.